Nukadoko (A Fermented Rice Bran Bed for Pickling)
Nukadoko is an essential component for making quintessential Japanese pickles called Nukazuke. It's quite a process from start to finish but once you make it, you could reuse it semi permanently with proper maintenance!* The unit measurement is set for metric by default for accuracy.
Servings: 0
Ingredients
- 1 kg rice bran
- 130 g fine sea salt
- 1000 ml water
- 2 pcs whole dried red chili peppers preferably Takanotsume pepper [Japanese red chili peppers]
- 5 g dried kombu sheet (2 in x 4 in / 5 cm x 10 cm) cut into 0.5 in / 1.5 cm strips
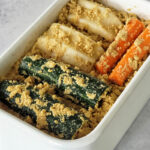
- A few pieces of fresh veggie scraps cleaned and pat dried (cabbage, napa, carrot, daikon radish would be good choices)
Instructions
- In an oversized large mixing bowl or something similar, combine rice bran and sea salt. Use hand and mix until well incorporated.
- Slowly add water (separate into 2-3 times to avoid lumps) and mix by clean hand until well incorporated. Squeezing the mixture with hand may be the best way to do this.
- Transfer the rice bran mixture to a container to store nukadoko (see the “Choice of Container” in the “Notes” below.)
- Add red chili peppers and kombu strips and mix again.
- Place veggie scraps and bury them into the mixture completely. Use hand to compress the mixture down to get rid of air pockets. Wipe off the rim of the container with a clean cloth then cover lightly (crack open) and store in a cool & dry place (not in the fridge yet) and avoid direct sunlight (68-77F°/20-25 C°.)
- For the first 10 days, mix thoroughly twice a day (every 12 hours.) For mixing, you can do by using a rice paddle, a stir fry paddle, a spatula, or by clean hand. At the time of mixing, taste a tiny amount of the rice bran mixture. This is a perfect way to check the fermentation progress. Remove the veggie scraps and replace with new ones every 4-5 days (see the complete instructions of “How to Replace Veggie Scraps” and “A guide for Checking Fermentation Progress” in the “Notes” below.)
- For the next 10 days, mix thoroughly once a day (every 24 hours.) Follow the same instructions in step 5 & 6. The only difference is that you can cover with the lid completely.
- The mixture should be fully fermented around day 20. At this point, it should still taste briny but not harsh, and have richer & complex umami flavor, with a hint of sourness. Those are the signs of properly fermented nukadoko. Now, cover with the lid completely and store the container in the fridge. At the cold temperature in fridge, the mixture will be in a stable condition and slow down the process of fermentation. However, you will need to mix the mixture at least every 2-3 days or more often to avoid getting mold (see the “Ongoing Maintenance” in the “Notes” below.)
- Now you can use it to start making nukazuke pickles!
Notes
Choice of Container
- Use a container with a lid that’s large enough to fit a Japanese cucumber or a half of English cucumber. Also, be sure to look for something that’s easy to mix the nukadoko mixture.
- Shallow container and plastic container aren’t recommended.
- I use Noda Horo Enamel Container “Nukazuke Bijin (beauty)” that’s made for storing nukadoko. It's an enamel coated stainless steel tub with a plastic lid. The container is a fairy small & sleek that doesn't take up too much space in the fridge. This particular container is a perfect size for using 1 kg / 2.3 lbs of rice bran that this recipe yields for. The only thing I notice is that it isn't air-tight so it slightly releases the smell in the fridge but it's not bothersome. I ordered from Amazon Japan. You could also order the same one from Amazon in your country.
- If you use a different container, I suggest using a deep rectangular or round container with a lid should work (at least about 5-inch {13-cm} depth, 10-inch {24.5-cm} length.)
- For accuracy, use a scale to measure by the weight rather than using the cup method.
- Use an equal amount of rice bran to water (1:1)
- Use 13 % of sea salt to the weight of rice bran.
- Rice bran is basically the outer layers of rice grain. When the rice crops are milled to make white rice, what's left is the bran. It's actually high in fiber and nutritious.
- I buy Organic Rice Bran from the rice factory New York. They also have a conventional option.
- You can store the remaining rice bran in the freezer in an airtight sealed bag. You can dry roast to use them as sprinkles on rice, soup or make salad dressing!
- Dried red chili peppers are to prevent the nukadoko from being spoiled.
- Since this is an authentic Japanese recipe, I use Japanese red chili peppers called takanotsume which means "the claw of the hawk.”
- If you can't find the takanotsume pepper, other dried red chili peppers should work as long as it's not smoked. I put them as a whole but as the days go by, they will eventually break down in the nukadoko. You can add more later as needed as a routine maintenance.
- I buy Takanotsume from The Japanese Pantry.
- Kombu is Japanese kelp which is usually sold dried.
- There are a couple of different types of dried kombu available such as ma-kombu, rausu kombu, and rishiri kombu. I’d recommend using either ma-kombu or rausu kombu for this recipe.
- I use Ma-Kombu from Japanese Pantry or Ma-Kombu from Umami Insider.
- The veggie scraps are to start and to continue the initial fermentation.
- I say "scraps" but I don't really mean the parts to be discarded. Make sure to use fresh & clean ones!
- It's best to use veggies that are high in water content. I use cabbage, carrots and daikon radish. Napa cabbage can be a great choice, too!
- Remove the old veggie scraps from the nukadoko. Use fingers and strip off the rice bran that’s coated around the veggies as much as possible. Do this over the container so you don’t waste any the rice bran mixture!
- Then, squeeze the veggie scraps over the container to collect liquid from the veggies and set aside. You should taste the scraps to check the fermentation progress. After that, place new veggie scraps and bury them into the nukadoko mixture completely.
- Use hand to compress the nukadoko mixture down to get rid of air pockets. Cover lightly (crack open) for the first 10 days and cover completely for the next 10 days. Store in a cool & dry place and avoid direct sunlight.
- Day 1-7: The nukadoko mixture will taste just salty and you should see the change in the consistency from being somewhat dry to slowly becoming moist.
- Around day 7-12: The nukadoko mixture will still taste salty but it gets a little milder. Instead, it slowly starts developing umami flavor.
- Around day 12-20: The nukadoko mixture will slowly start developing sourness. As the days go by, it will develop a cultured food taste like traditional cheese or other fermented food. In the end, the consistency should be similar to miso paste and the taste should be briny, richer in umami, more complex, pleasantly sour, with a cheese-like taste.
- Although nukadoko can be stored at a room temperature which is the traditional method, it’s more convenient to keep refrigerated for easier maintenance.
- Nukadoko doesn't have a strong (unpleasant) smell but it certainly has a distinctive smell (kind of nutty and slightly pickled-radish-like smell.) It's not truly a bad smell but you'll know it's there.
- Keep the fully fermented nukadoko tub (container) in the fridge. Mix thoroughly at least once every 2-3 days to avoid getting spoiled. When mixing, remember to compress the nukadoko mixture down to get rid of air pockets, then clean the edge of the container, then put the lid back on.
- After a few days of not mixing nukadoko, you may see a white substance forming on the surface of nukadoko which is normal. Just mix it as usual.
- As you start making pickles, veggies will release moisture and the nukadoko will slowly become diluted and loose. When this happens, it’s important to maintain the proper salt level and the consistency by adding more salt and extra rice bran as needed.
- You can also replenish chili peppers and kombu as needed.
Did you make this recipe?Mention @plantbased_matters or tag #plantbased_matters!